As a result, they boot their device to the TRWP recovery via the IMG file and in the next boot, it gets replaced with stock recovery. Today we will address all these issues. We will show you how to permanently install the TWRP Recovery via just the TWRP.img file. Follow along. It was all so good until Google decided to bring in the A/B partition thing. This dual-slot resulted in a slew of changes, most noticeably in the recovery partition being removed. Yes, now there is no recovery partition, rather everything is now taken care of by the boot partition. This is the reason why you cannot simply flash the twrp recovery using the fastboot flash recovery recovery.img command. We first have to boot the twrp using the fastboot boot twrp.img command. Once the IMG file gets booted, you could then flash the ZIP file to make it permanent. What if you don’t flash the ZIP file? Well then after each boot, the custom recovery will be replaced with the stock recovery. So you will have to connect the device to the PC send in the fastboot boot command every time you need to use the TWRP. This definitely requires a lot of effort. But the thing is not users have a say in this. We are seeing many devices only have the TWRP IMG file but not the ZIP file. As a result, these users can’t get a taste of what the permanent TWRP feels like. If you are also sailing in the same boat, then this guide will come in handy. Today, we will show you how to Permanently Install TWRP without the TWRP ZIP file in the Recovery Ramdisk, only using the TWRP IMG file. Follow along.
[3 METHODS] How To Transfer or Install Files via TWRP Recovery[Update: Added Magisk 20.3] Everything About Magisk- Manager, Modules and MoreInstall Custom ROMs on any Android Device- Includes A/B PartitionHow to Boot Any Android Device to TWRP Recovery
How to Permanently Install TWRP without TWRP ZIP File (only using TWRP.img file)
There are some things that could easily be done without a TWRP Recovery, for example, you could easily root your device without TWRP. But for a plethora of other things (most importantly flashing a Custom ROM), TWRP is a must. Well, we could go on and on as to why we need a custom recovery like TWRP, but since you have come here, you already knew about all this. So let’s get straight to the point. Follow the below prerequisites and make sure you meet each of them. Only after that, you should proceed with the installation instructions. Droidwin and its members wouldn’t be held responsible in case of a thermonuclear war, your alarm doesn’t wake you up, or if anything happens to your device by performing the below steps.
Prerequisites
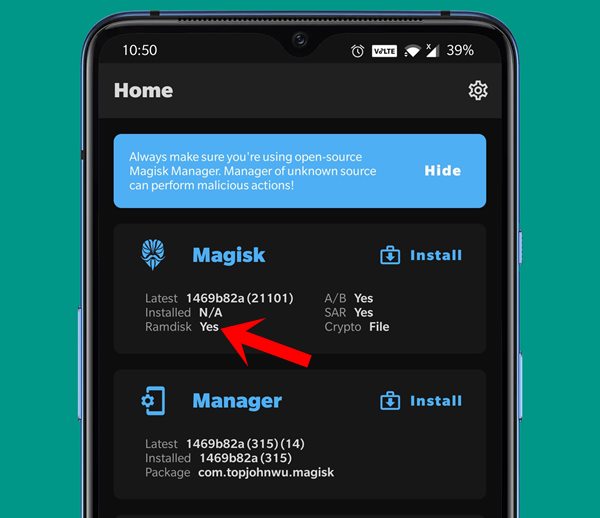
First and foremost, check if your device has a Ramdisk or not. To do so, install the Magisk Manager app on your device and then launch it (it doesn’t require root). Now check for the status next to Ramdisk. If it says YES, then proceed ahead with the steps to permanently install TWRP, otherwise, it is not advised (the tech enthusiasts could still try out this tweak on their devices if they wish).Along the same lines, I haven’t tested this method on Samsung devices. But judging by the fact that it requires flashing the TWRP TAR file via Odin, these steps might not work on Samsung devices either. Again if you wish to retry, you are more than welcome, though at your own risk. Whatever is the result, do let me know in the comments so that it may help out other users as well.With that said, let’s now come to the requirements of this article to permanently install TWRP. So to begin with, make sure you have your device’s TWRP.img file. If you don’t have it yet, then head over to the TWRP official page and download the same. Or if there’s no official build, search for an unofficial one over at XDA. Even if that is futile, drop in your device name in the comments, we will help you out.Furthermore, install the Android SDK and Platform Tools on your PC. This will be needed so that your device is recognized by your PC in fastboot mode.
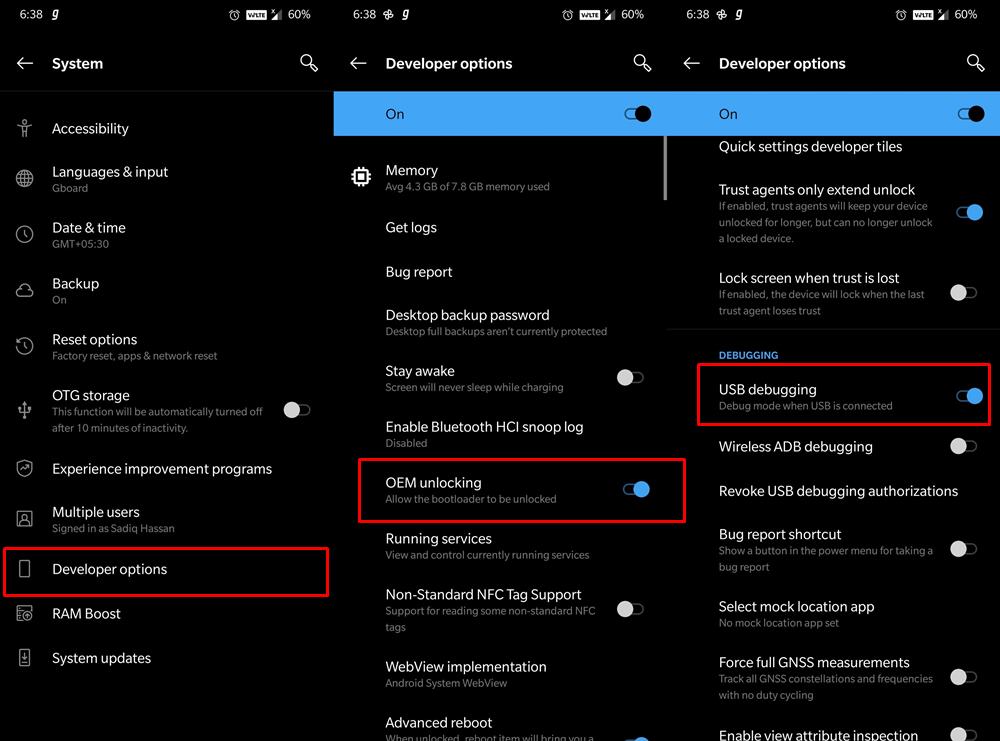
STEP 1: Enable USB Debugging and OEM Unlock
To begin with, you will have to enable USB Debugging and OEM Unlocking on your device. The former will make your device recognizable by the PC in ADB mode. This will then allow you to boot your device to Fastboot Mode. On the other hand, OEM Unlocking is required to carry out the bootloader unlocking process. So head over to Settings > About Phone > Tap on Build Number 7 times > Go back to Settings > System > Advanced > Developer Options > Enable USB Debugging and OEM Unlocking.
STEP 2: Transferring of TWRP
First off, rename the downloaded twrp recovery to just twrp. The complete name will hence be twrp.img. Then transfer this twrp.img file to the platform-tools folder. Furthermore, also make a copy of this recovery and transfer it to your device. Just a simple Copy (Ctrl+C) and Paste (Ctrl+V) will do.
Fix Magisk Module Bootloop without TWRP RecoveryRoot Android 11 via Magisk Patched boot.img (without TWRP)How to Update Magisk ZIP and Magisk Manager (without TWRP)Disable DM-Verity or Android Verified Boot without TWRP
STEP 3: Launch the Command Prompt
Head over to the platform-tools folder and in the address bar, type in CMD and hit Enter. This will launch the Command Prompt.
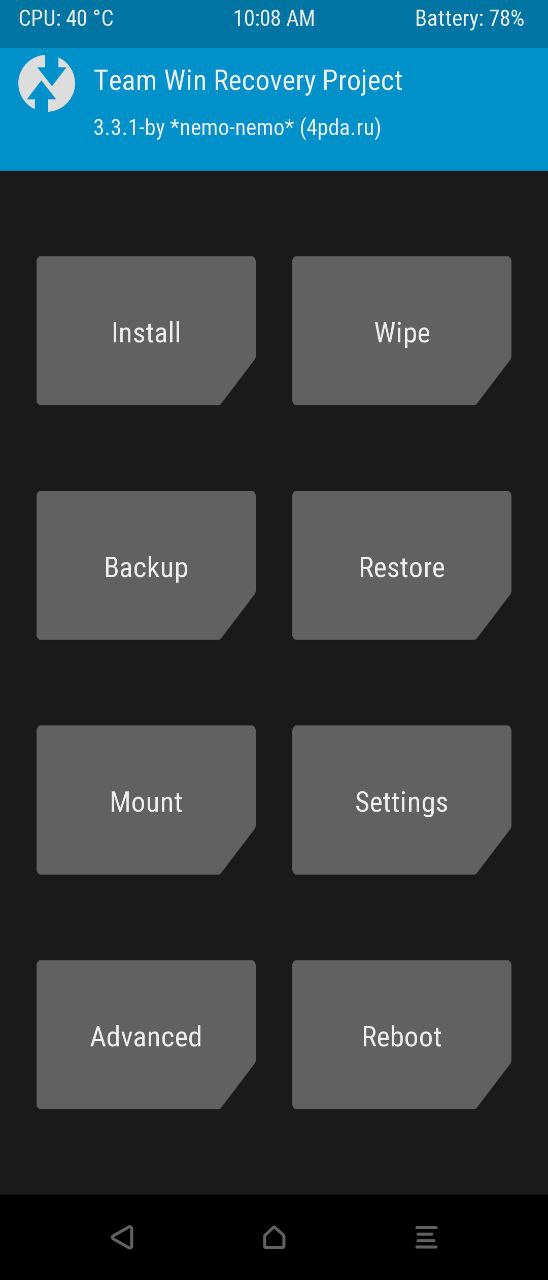
STEP 4: Boot your device to TWRP
STEP 5: Permanently Flash TWRP
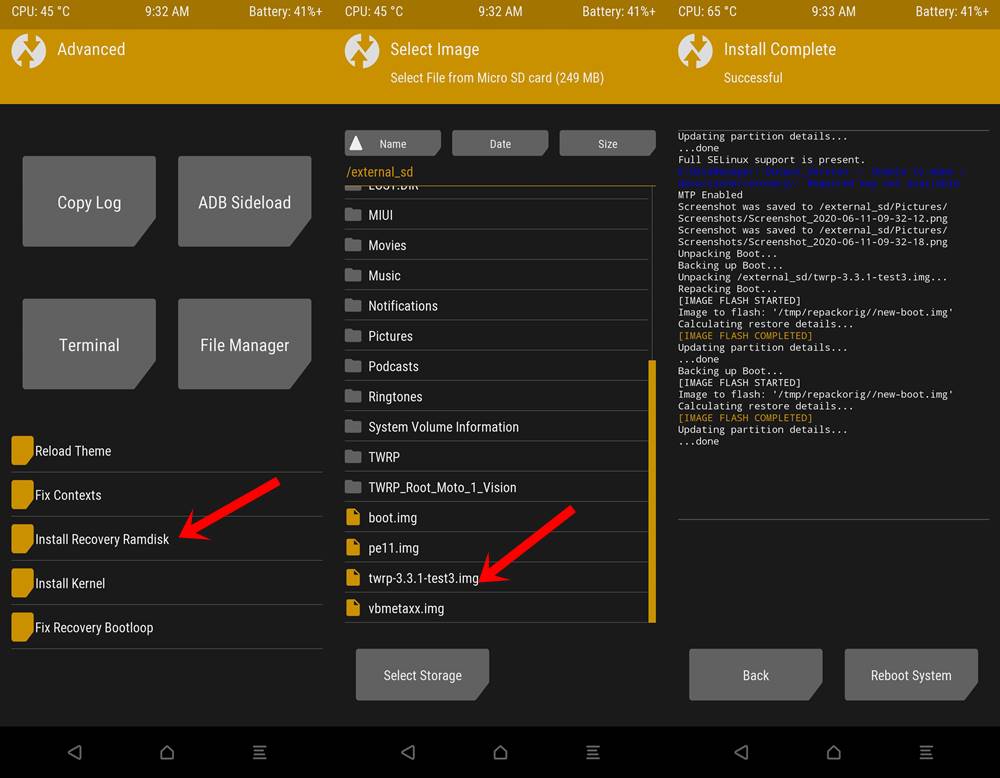
Even though now your device has been booted to the TWRP Recovery, it is just a temporary boot. The next reboot will replace this custom recovery with the stock one. So it is now time to make it permanent. As already mentioned, we would only be using the twrp.img file. Here is how to proceed ahead: So with this, you have now permanently installed the TWRP Recovery in the Recovery Ramdisk on your device using the twrp.img file. Do share your views on the same, in the comments section. Likewise, if you are having any issues with respect to any of the above-mentioned steps, do let us know your queries in the comments.
Using the Flash Current TWRP Feature
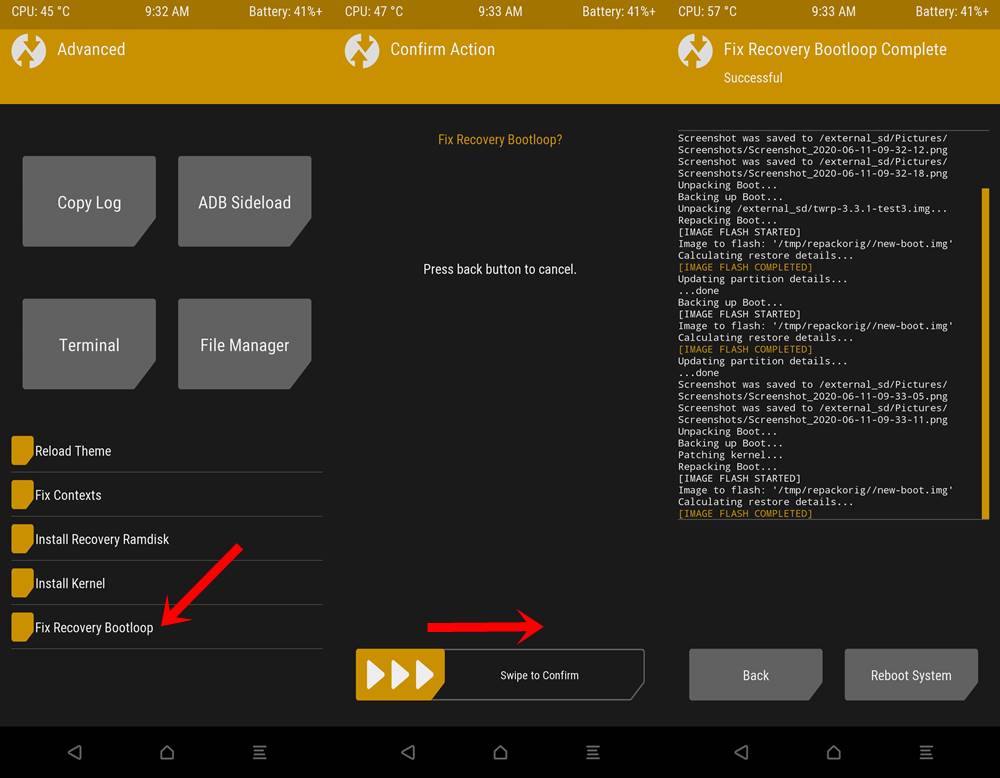
Instead of using the Install Recovery Ramdisk option, you could now also use the Flash Current TWRP option. The benefit of this method over the former one is the fact that you would no longer have to manually select the twrp.img file and then flash it [you will not have to perform the third point in the below instruction]. Rather as soon as you select the Flash Current TWRP option, it will automatically (and permanently) flash the TWRP.img file on your behalf.
This feature has just been added officially over to TWRP 3.6.0 (and on some older TWRP 3.5 versions). So to try it out, you need to go to the Advanced menu of TWRP and just select Flash Current TWRP. Once done, make sure to fix the recovery bootloop from the Advanced section as well.
Fix TWRP Install Recovery Ramdisk Option Missing
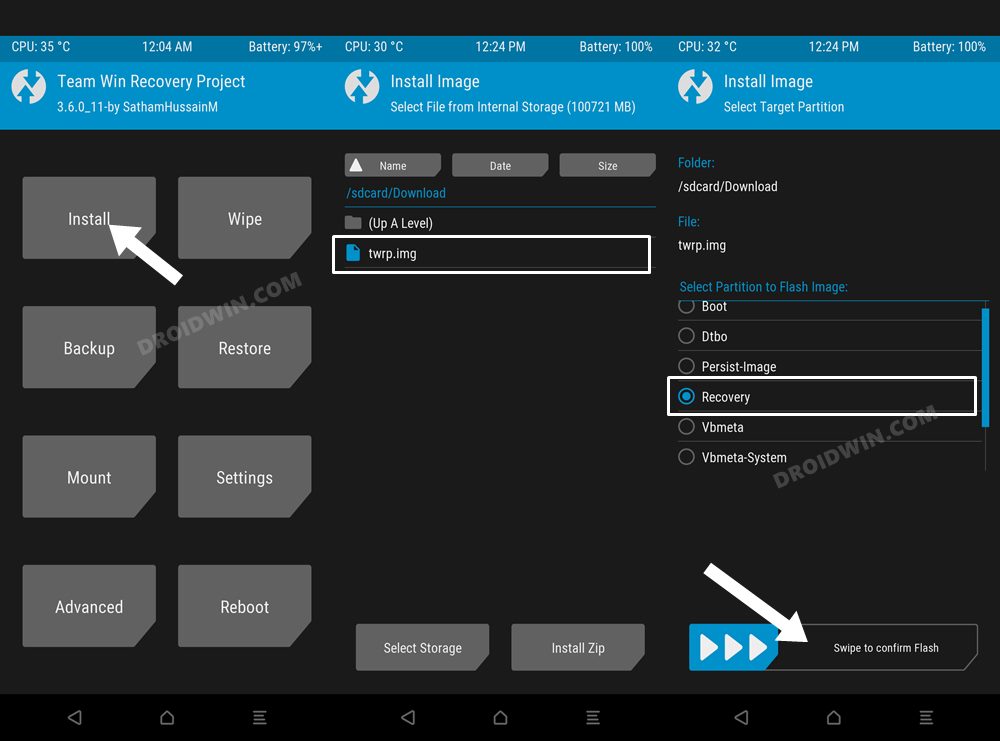
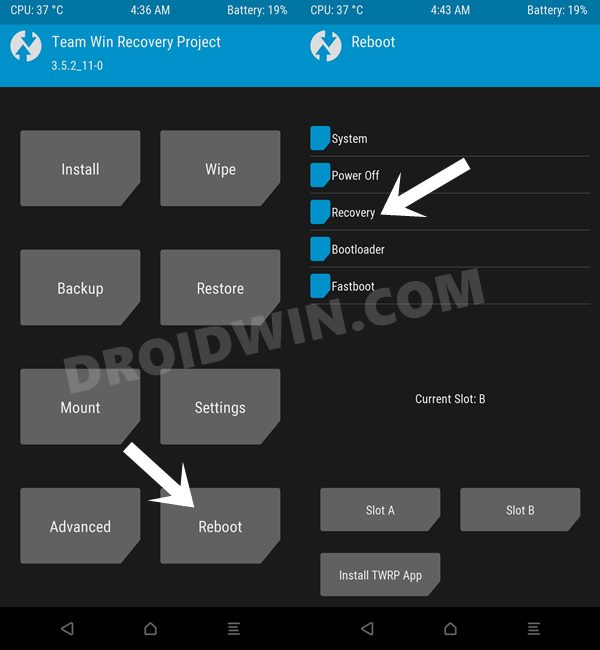
If your device has the recovery partition, then you might not see the Install Recovery Ramdisk option. This is because you wouldn’t even need this feature in the first place. You could directly flash the TWRP to the recovery partition using the Fastboot Commands or from the TWRP Recovery itself. Here’s how:
Using Fastboot Command:
Boot your device to Fastboot and use the below command to permanently flash the TWRP using just its IMG file:
Using TWRP itself
How to Install OTA Updates in Rooted Android DeviceHow to Fix FAILED (remote: unknown command) ErrorDetailed Steps to Fix adb is not recognized ErrorHow to Fix Android Device stuck in Fastboot Mode
About Chief Editor