While most Samsung devices come with an Exynos chipset, it yet still manages to have decent support for custom development. No doubt it has a few extra complications in the form of Prenormal RMM State, DEFEX, and VaultKeeper. But still, developers have managed to build quite a few custom binaries for this OEM. Once you unlock the device’s bootloader, you have literally opened the floodgates to a plethora of customizations. These include the ability to flash a custom ROM, replace the device’s stock recovery with a custom one such as TWRP, etc. Likewise, you could even gain access to the system partition via Magisk. In other words, you would have attained root aka SuperUser access. As a result, you could then flash Magisk Modules, Xposed Framework, Substratum Themes, and a plethora of other themes. This rooting could then be achieved via two different methods- with TWRP or without TWRP. It is with the latter method that would require you to patch the Samsung AP Firmware file via Magisk Manager. Let’s check out why!
How to Download Samsung Stock Firmware/ROM via Frija ToolUnlock Bootloader on any Samsung Device [New VaultKeeper Method]How to Boot any Samsung Device to Download ModeDownload Google Camera Port for Samsung Galaxy S20, S20+, and S20 Ultra 5G
The Need to Patch Samsung AP Firmware via Magisk
While the option of rooting your device via TWRP is pretty easy and could be executed within a few seconds, however, it isn’t applicable for every device. The reason stands simple- not every device has a TWRP build. And the ones that don’t, take the approach to root without TWRP Recovery. In this regard, the general syntax involves downloading the stock firmware and extracting the stock boot.img file. This file is then patched via Magisk and flashed via Fastboot. However, with Samsung things are a little bit different. To begin with, as opposed to other OEMs such as OnePlus and Google, Samsung doesn’t upload the firmware on their site. So you will have to download it from a third-party tool (which by the way does their job pretty well). Next up, unlike other OEMs, there isn’t stock boot.img that you could patch. Rather, you would have to patch its AP Firmware file. Once the patching is complete, other OEMs simply requires you to patch it via Fastboot Commands (after booting the device to Fastboot Mode). Again, Samsung takes a road less traveled. Rather than booting to Fastboot, you have to boot to Download Mode, and rather than using Fastboot Commands, you will have to use the Odin Tool for flashing purposes. As a result, many newcomers who have just bought a Samsung device find it a tad difficult to step into custom development. But fret not, In this guide, we will be listing out detailed instruction steps to patch the Samsung AP Firmware file via Magisk Manager. Follow along.
How to Pass Magisk SafetyNet on Rooted Android 11Root Android 11 via Magisk Patched boot.img (without TWRP)Fix Magisk patched boot.img issue while Rooting Android 11Disable DM-Verity or Android Verified Boot without TWRP
How to Patch Samsung AP Firmware via Magisk
We will be listing out the below instructions in separate sections for ease of understanding. Proceed in the same manner as mentioned.
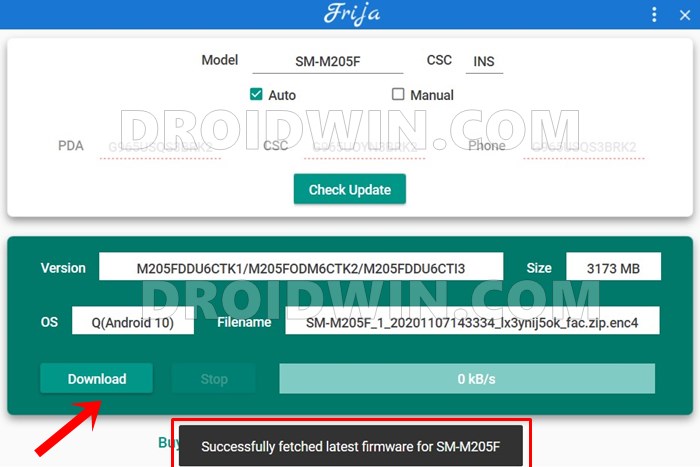
STEP 1: Download Samsung Stock Firmware
To being with, you will have to download the stock firmware for your Samsung device. There are quite a few third-party tools for the same, however, we would suggest you go for Frija. The reason is that it provides the fastest download speed and is extremely easy to operate. So with that said, refer to our detailed guide on How to Download Samsung Stock Firmware/ROM via Frija Tool.
STEP 2: Extract Samsung Stock Firmware
Now that you have downloaded the firmware, it’s time to extract its content. For that, you may use WinZip, WinRAR, 7ZIP, etc. So proceed ahead with the extraction, and once done, you should get the following five files (each in .tar.md5 format):
APBLCPCSCHOME_CSC
As of now, we would be needing the AP firmware file. So copy this file and send it to your device’s internal storage. This file is quite heavy (anywhere around 3-5GB), so it is recommended to transfer it via USB cable (the wireless transfer method might take up quite a few extra minutes).
Detailed Steps to Fix adb is not recognized ErrorFix: pip is not recognized as an internal or external commandHow to Fix Unauthorized Device with ADB Commands [3 methods]How to Fix Error: Cannot load recovery.img
STEP 3: Install Magisk Manager on your Samsung device
Now, download and install the Magisk Manager APK onto your device. If you are on Android 11, then you might face issues with the app’s stable build. Therefore, you should download the Canary build and then change its update channel to Canary from within the app’s Settings menu. If you are looking for detailed steps, then this guide shall help you out: Fix Magisk patched boot.img issue while Rooting Android 11.
STEP 4: Patch Samsung AP Firmware via Magisk Manager
That’s it. This was all from this guide on how to patch the Samsung AP Firmware file via Magisk Manager. Once you have got this patched file, you may use it to root your Samsung device via Odin. On that note, if you have any queries concerning the aforementioned steps, do let us know in the comments section below. We will get back to you with a solution at the earliest.
How to Update Magisk ZIP and Magisk Manager (without TWRP)Fix Magisk Module Bootloop without TWRP Recovery[Update: Added Magisk 21] Everything About Magisk- Manager, Modules and MoreHow to Fix TWRP Error 20 GApps after flashing LineageOS
About Chief Editor