There’s no better way to cement this statement than by looking at the fact that the Xperia 1 III has already been blessed with quite a few custom ROMs based on the latest Android 13 builds. These include the likes of Rice Droid, SparkOS, and the ever-so-popular LineageOS. And in this guide, we will show you the steps to welcome abode these ROMs onto your device. So without further ado, let’s get started.
Prerequisites to Installing Android 13 Custom ROMs on Xperia 1 III
Irrespective of the ROM you flash, the process will wipe off all the data on your device. So please take a complete device backup beforehand. Droidwin and its members wouldn’t be held responsible in case of a thermonuclear war, your alarm doesn’t wake you up, or if anything happens to your device and data by performing the below steps.
STEP 1: Install Android SDK
First and foremost, you will have to install the Android SDK Platform Tools on your PC. This is the official ADB and Fastboot binary provided by Google and is the only recommended one. So download it and then extract it to any convenient location on your PC. Doing so will give you the platform tools folder, which will be used throughout this guide.
STEP 2: Enable USB Debugging and OEM Unlocking
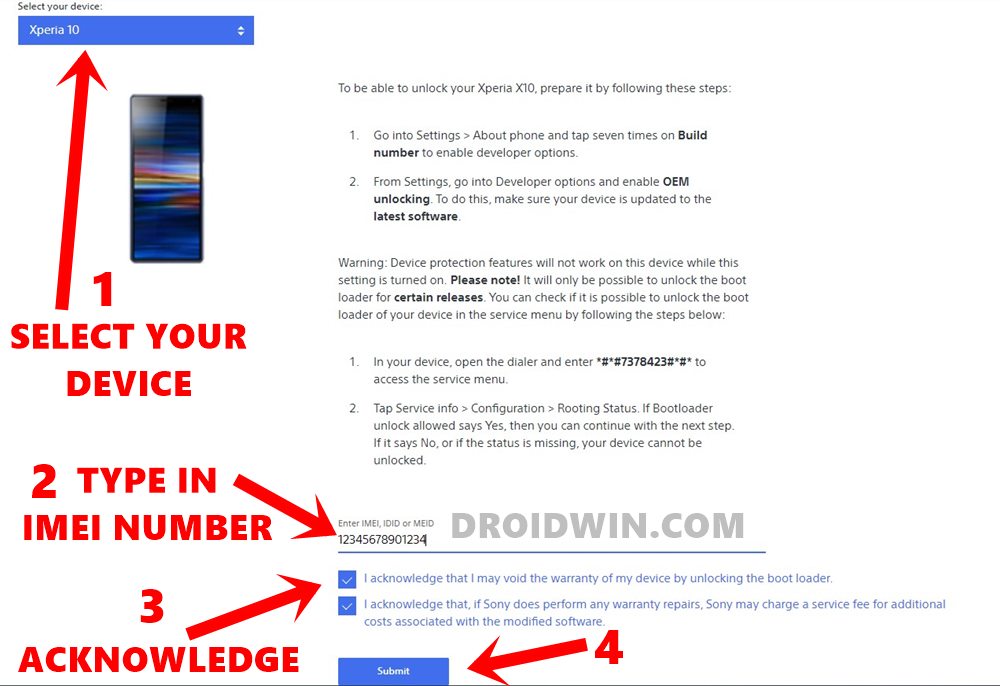
Next up, you will also have to enable USB Debugging and OEM Unlocking on your device. The former will make your device recognizable by the PC in ADB mode. This will then allow you to boot your device to Fastboot Mode. On the other hand, OEM Unlocking is required to carry out the bootloader unlocking. So head over to Settings > About Phone > Tap on Build Number 7 times > Go back to Settings > System > Advanced > Developer Options > Enable USB Debugging and OEM Unlocking.
STEP 3: Unlock Bootloader on Sony Xperia 1 III
Next up, you will also have to unlock the device’s bootloader. Do keep in mind that doing so will wipe off all the data from your device and could nullify its warranty as well. So if that’s all well and good, then please refer to our detailed guide on How to Unlock Bootloader on any Sony Xperia Device. Once done, don’t restore the backup now as we will have to again format the device in the subsequent steps.
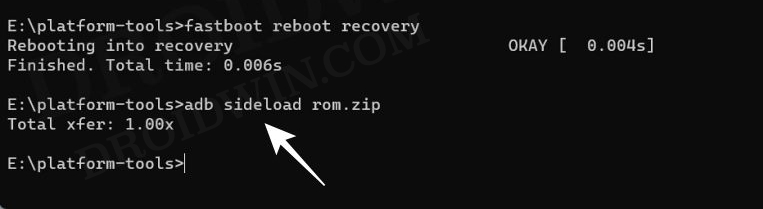
STEP 4: Download LineageOS 20 ROM for Sony Xperia 1 III
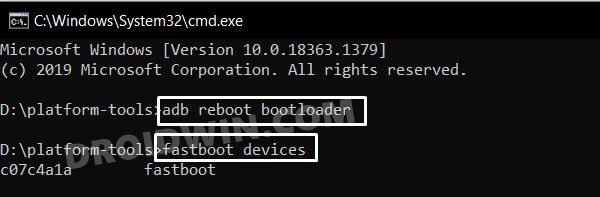
STEP 5: Boot Sony Xperia 1 III to Fastboot Mode
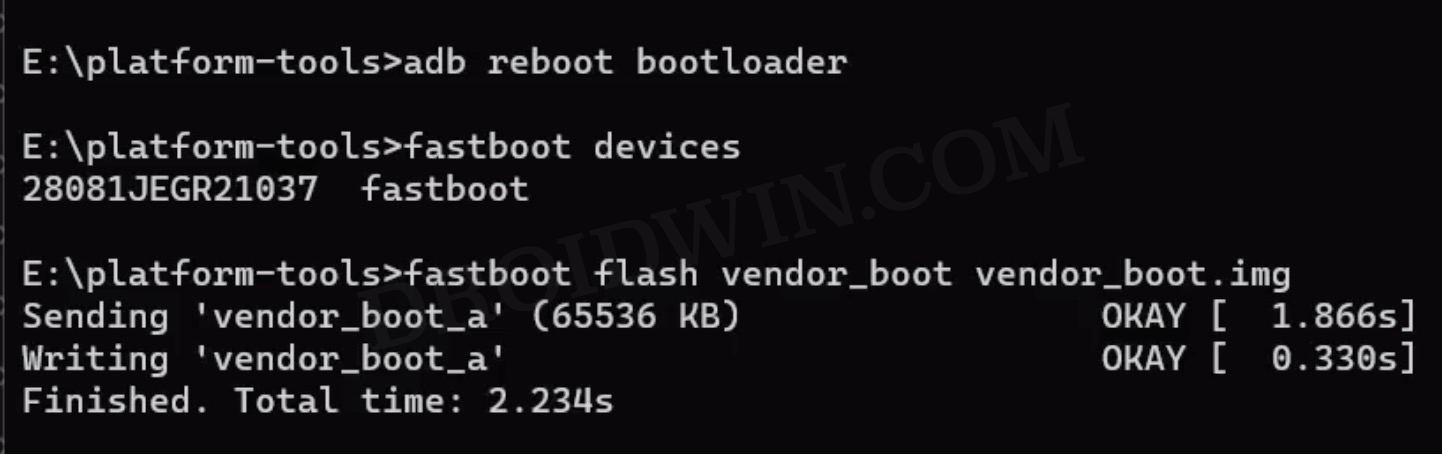
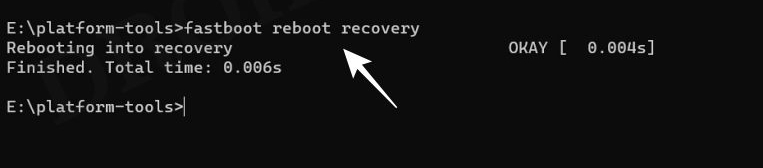
Install LineageOS 20 Android 13 on Sony Xperia 1 III
Make sure that you are on the latest Android 13 firmware and then refer to our below-linked guide for the flashing instructions.
Install riceDroid Android 13 on Sony Xperia 1 III
Before flashing, make sure you are on the latest Android 13 firmware (61.2.X.X.XXX). Moroever, the ROM already comes with GApps, so need to flash it separately. Not to forget, here are a couple of bugs that you are likely to come across:
Smooth Display (Just turn it off as soon as you boot into the OS since functionally, it does nothing)120Hz Recording on Cinema/Video Pro (Fixed DT-side needs new build to be pushed)
That’s it. These were the steps to install the riceDroid Android 13 Custom ROM onto your Xperia 1 III. If you have any queries concerning the aforementioned steps, do let us know in the comments. We will get back to you with a solution at the earliest.
Install SparkOS Android 13 on Sony Xperia 1 III
Before flashing, make sure you are on the latest Android 12 firmware (61.1.X.X.XXX). Moroever, the ROM already comes with GApps, so need to flash it separately. Not to forget, here are a couple of bugs that you are likely to come across: • Camera add-ons like Panorama for example, can’t be installed by default, but you can install them if you flash the module provided below (Libs will be added by default in future builds so that the module won’t be needed) • Regular 120FPS doesn’t work in Cinema Pro, only SlowMo 120FPS does • SDCard may or may not work (e.g it asks you to format it) • SIM isn’t detected on xx62 model (US Variant) • Bluetooth Audio is dead for now (Also will be fixed in newer builds, for now only Speaker/3.5mm works) • Proximity sensor makes the device freeze, (e.g putting the phone to your ear in a call) this can be fixed by adding the “Sensors Off” QS Tile and then enabling it during a call. That’s it. These were the steps to install the SparkOS Android 13 Custom ROM onto your Xperia 1 III. If you have any queries concerning the aforementioned steps, do let us know in the comments. We will get back to you with a solution at the earliest.
About Chief Editor